Visual Studio 發佈專案時自動轉換組態對應的 Web.config
軟體從開發到生產的各個階段,很常遇到不同環境需要不同的組態設定(例如資料庫連線字串、系統資源對應路徑等),這些繁瑣的設定若是每次都手動修改實在容易出錯,而 Visual Studio 本身就有 Web.config 組態檔轉換功能,好好利用可以大大節約時間並降低錯誤機率,更能專注在開發本身。
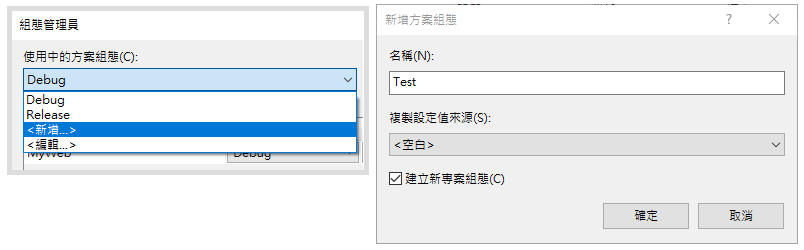
專案建立好時預設有兩個組態 Debug 和 Release,⼀般我會再建立⼀個 Test 組態在測試環境使用,所以本篇記錄 1. 如何新增組態和與之對應的 Web.config 設定檔,和 2. 設定 Web.config 轉換內容。
一、前置作業
- 以 ASP.NET MVC 的預設範本建立專案(Visual Studio 2019)
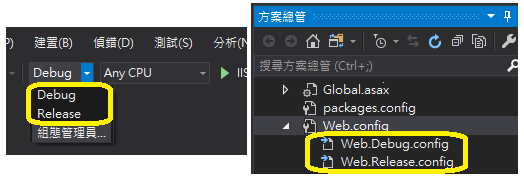
- 檢視預設組態設定:預設的 Debug 和 Release 組態各有⼀個對應的 config 檔(Web.{組態名稱}.config)
二、新增組態設定與設定檔
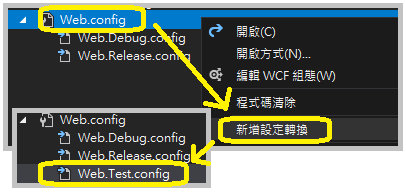
從「組態管理員」中新增「Test」組態後,在方案總管中會發現 Web.Test.config 檔案並沒有自動產生,需要手動「新增設定轉換」(Add Transform),檔案就會出現了。
三、設定不同組態發行時對應的 Web.config
接下來要編輯這些檔案裡面的內容了!了解語法之前來快速看一下一個簡單的轉換範例和呈現的效果。
範例與效果
就以發佈 Release 組態來說,假設原本的 Web.config 有個參數 Env:
<appSettings>
	<add Key="Env" value="Dev" />
</appSettings>
對照在 Web.Release.config 的 Env 參數設定,除了將 value 設為 Release 外,另外加了 xdt:Transform 和 xdt:Locator 屬性(屬性詳細說明見下方「語法詳述」),如下:
<appSettings>
	<add Key="Env" value="Release" xdt:Transform="SetAttributes" xdt:Locator="Match(key)" />
</appSettings>
實際發佈時, Env 的設定就會轉換為 Release了。
或者可以用內建的預覽工具發佈前預先檢視結果與差異處:
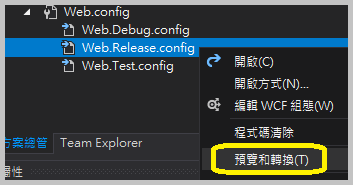
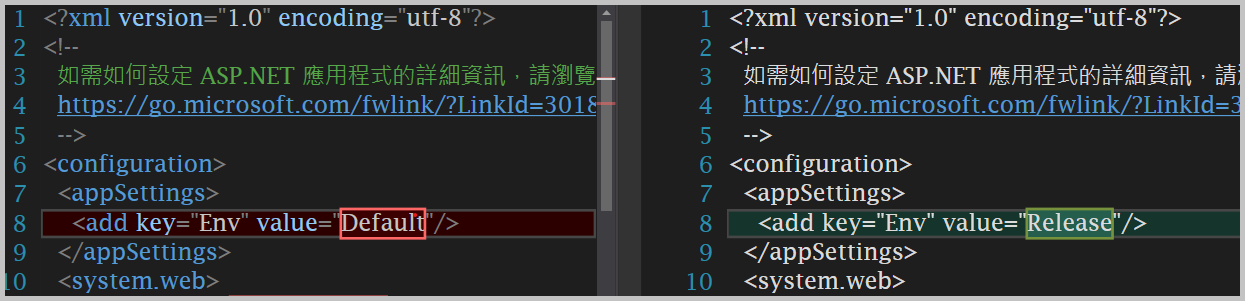
↑ 左邊是原始的設定檔,右邊則是轉換後的結果,差異處也都自動標記了。
語法詳述(Web.config Transformation Syntax)
回顧一下 Web.Release.config 的原始內容,或者新建的 Web.Test.config 也有相同的內容:
<?xml version="1.0" encoding="utf-8"?>
<!-- 如需使用 web.config 轉換的詳細資訊,請前往 https://go.microsoft.com/fwlink/?LinkId=125889 -->
<configuration xmlns:xdt="http://schemas.microsoft.com/XML-Document-Transform">
  <!--
    在下面的範例中,"SetAttributes" 轉換只會在 "Match" 定位程式找到
    值為 "MyDB" 的屬性 "name" 時,才將 "connectionString" 的值變
    更為使用 "ReleaseSQLServer"。

    <connectionStrings>
      <add name="MyDB"
        connectionString="Data Source=ReleaseSQLServer;Initial Catalog=MyReleaseDB;Integrated Security=True"
        xdt:Transform="SetAttributes" xdt:Locator="Match(name)"/>
    </connectionStrings>
  -->
  <system.web>
    <compilation xdt:Transform="RemoveAttributes(debug)" />
    <!--
      在下面的範例中,"Replace" 轉換將會取代 web.config 檔案
      的整個 <customErrors> 區段。
      請注意,因為在 <system.web> 節點之下
      只有一個 customErrors 區段,所以不需要使用 "xdt:Locator" 屬性。

      <customErrors defaultRedirect="GenericError.htm"
        mode="RemoteOnly" xdt:Transform="Replace">
        <error statusCode="500" redirect="InternalError.htm"/>
      </customErrors>
    -->
  </system.web>
</configuration>
和一般 Web.config 不同的是,它引用了 XML-Document-Transform 命名空間(第 3 行),對應到 xdt 前置詞的使用(xdt:Locator 和 xdt:Transform),用來處理元素和屬性的轉換;xdt 前置詞在轉換後的文件中不會出現。
【Locator】
用來定位要轉換的元素位置,為非必要屬性,若未設定時則找出所有同層級元素,再依 Transform 屬性決定轉換模式。Locator 有三種設定方式。
xdt:Locator="Condition(XPath 運算式)"
範例:xdt:Locator="Condition(@name='oldname' or @providerName='oldprovider')"
說明:找到符合 XPath 運算式條件的元素。例如屬性 name 為 oldname 或 providerName 為 oldprovider 的所有元素。
xdt:Locator="Match(屬性1,屬性2,屬性3,…)"
範例:<add name="AWLT" connectionString="newstring" providerName="newprovider" xdt:Transform="Replace" xdt:Locator="Match(name, providerName)"/>
說明:找到與所列屬性的值「皆」相同的元素。例如屬性 name 為 AWLT 且 providerName 為 newprovider 的所有元素。
xdt:Locator="XPath(XPath 運算式)"
範例:<add name="AWLT2" connectionString="newstring" providerName="newprovider" xdt:Transform="Replace" xdt:Locator="XPath(/configuration/connectionStrings/add[@name='AWLT' or @providerName='oldprovider'])"/>
說明:完全使用 XPath 運算式(絕對路徑)來尋找元素,不以元素現在的位置為參考。例如即使將上述標籤放到 <appSettings> 元素下或直接放在 <configuration> 底下,其依然會找到 connectionStrings 中,符合 name 為 AWLT 或 providerName 為 oldprovider 的所有元素。
【Transform】
說明元素屬性該如何轉換,有八種方式。
xdt:Transform="Replace"說明:以轉換檔(Web.{組態名稱}.config)中的元素取代 Locator 屬性在 Web.config 中會找到的元素。如果找到多個元素,只會取代第一個。
xdt:Transform="Insert"說明:將轉換檔的元素加入 Web.config 中 Locator 所定義的同層級的元素區域中的最後面。
xdt:Transform="InsertBefore(XPath 運算式)"說明:將轉換檔的元素插入 XPath 運算式(絕對路徑)所指的元素前面(不是 Locator 所指的元素,在此處 Locator 沒有作用)。
<authorization>
  <allow roles="Admins" xdt:Transform= "InsertBefore(/configuration/system.web/authorization/deny[@users='*'])" />
</authorization>
上面範例設定轉換時在「拒絕所有使用者」的項目前,插入「允許系統管理者」的授權。
xdt:Transform="InsertAfter(XPath 運算式)"說明:和 InsertBefore 相反,是將轉換檔的元素插入 XPath 運算式(絕對路徑)所指的元素後面。
xdt:Transform="Remove"說明:移除 Locator 找到的第⼀個元素。
xdt:Transform="RemoveAll"說明:移除 Locator 找到的所有元素。
xdt:Transform="RemoveAttributes(屬性1,屬性2,屬性3,…)"說明:Locator 找到元素後,移除所指定的一到多個屬性。如果未選擇任何屬性,則所有屬性皆移除。
<compilation xdt:Transform="RemoveAttributes(debug)" />Web.Release.config 預設就會移除 compilation 的 debug 屬性,以提⾼發行時程式運行的效能。(原始內容第 16 行)
Transform="SetAttributes(屬性1,屬性2,屬性3,…)"說明:Locator 找到元素後,依照轉換檔的屬性設定所指定的一到多個屬性。如果未選擇任何屬性,則所有屬性皆依轉換檔進行設定。
