一直有建部落格的想法,也試過一些部落格平台和 WordPress,覺得平台上開站雖然方便,只要註冊帳號就好,但是版型調整方式有限,無法將網站改成符合自己心意的模樣,相較而言,WordPress 自由度很高,不過架構也相對複雜,還需要管理外掛和資料庫,有點麻煩,不太符合單純寫文章的想法,經過一番搜尋後,決定用靜態網站來架設我的部落格!
雖然 GitHub Pages 推薦使用 Jekyll 生成靜態網頁,但在 Windows 環境下 Jekyll 似乎比較不友善,而 Hugo 入門相對容易、官方文件有完整的教學,還有編譯速度快等優點,眾多因素考慮下,我選擇了 Hugo。
不過還是花了一些時間才把網站搞定,所以決定要記錄一下整個架站過程,包含 (1) 本機端開發環境的建置、(2) 上傳到 Github Pages 發布網站、(3) 自訂網域,以供參考。
以下
{username}為 GitHub 帳號名,{主題名稱}為所選的佈景主題名稱,例如我的是zzo。
本機端開發環境的建置
本機環境
作業系統:Windows 10
Hugo 可以安裝在 Windows、Linux、macOS 等作業系統,Linux 或 macOS 的安裝方式請參考官方文件。
以下建置過程預設環境已安裝 Git,也註冊 GitHub 帳號並建立名稱為 {username}.github.io 的 repo 了。
安裝套件管理器 CHOCOLATEY
以系統管理員身分執行 PowerShell,執行以下指令:
| |
若安裝無誤,執行 choco 可得版本資訊,例如:
| |
安裝 Hugo、建立新網站
PowerShell 繼續執行:
| |
如果選擇的主題需要擴充套件 Sass/SCSS 版本,執行:
| |
若不確定是否需要擴充套件的話,可以先跳過,之後執行 hugo server 出現以下類似錯誤時再安裝 hugo-extended:
ERROR 2021/05/08 16:44:51 TOCSS: failed to transform “main_parsed.scss” (text/x-scss). Check your Hugo installation; you need the extended version to build SCSS/SASS.
安裝完 Hugo 後,就可以建立新網站了。
| |
這個資料夾底下會建立 archetypes、content、static、themes 等資料夾,但 themes 裡面沒有預設的佈景主題,需要自己安裝。
可以到所選的主題的 GitHub repo 下載檔案解壓縮到 themes/{主題名稱}/ 或是用 git submodule 安裝(以下以 zzo 主題為例)。
| |
安裝完成後,官方文件使用指令新增組態檔 config.toml:
| |
但建議直接複製範例網站,到 themes/{主題名稱}/exampleSite/ 目錄下複製整個資料夾內容貼到 mywebsite 根目錄,再來修改組態檔,尤其有些佈景主題的組態檔結構複雜,只新增 config.toml 可能會缺少某些參數而編譯失敗。
如果要自訂 layouts 或 i18n 的內容,也從 themes/{主題名稱}/ 下複製資料夾到根目錄後進行修改。
先來設定 config.toml 的 baseURL 和網站語言等:
| |
本機端啟動網站:
以 hugo servre 方式啟動網站,Hugo 會隨時偵測檔案的異動來更新網頁,到預設網址 http://localhost:1313/ 就可以看到最新的內容,關閉網站用 CTRL+C 。
| |
上傳到 Github Pages 發布網站
官方文件使用 GitHub Action 來佈署網站(方法一),但如果不希望將網站的原始碼放到網路上,可以選擇只提交最後編譯好的靜態網頁(方法二)。
方法一:建立 gh-pages 分支
先確定使用的 Hugo 版本,以及是否安裝擴充套件。
| |
將整個資料夾 Push 到 Github repo ({username}.github.io):
| |
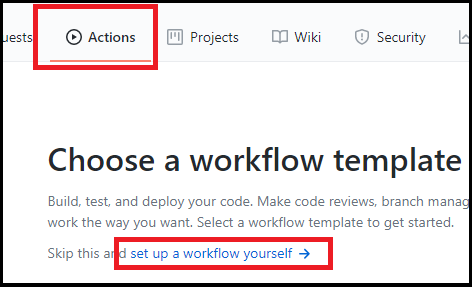
再到 GitHub 新增 gh-pages.yml 檔案。
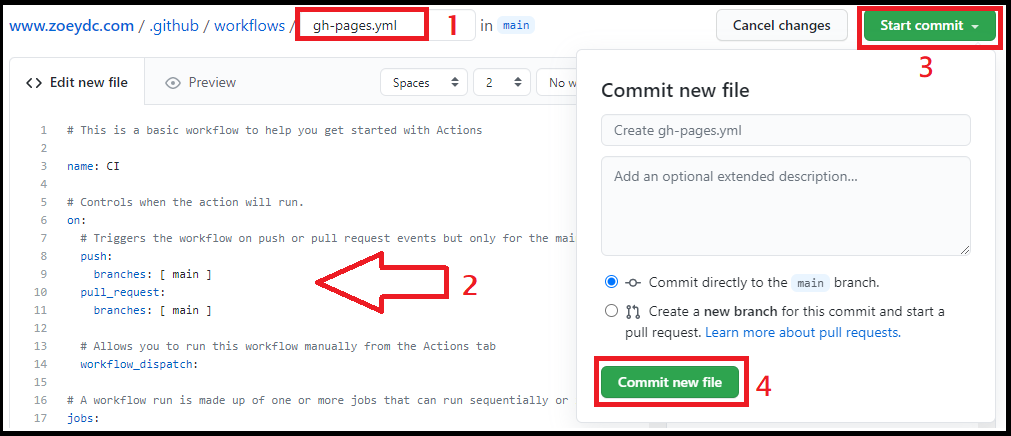
在上圖步驟 2 時,將 gh-pages.yml 內容用以下內容取代,其中 hugo-version 和 extended 再依需求進行設定:
| |
Commit 完成後,檢查 workflow 是否順利。(之後每次 main 分支有 commit 就會有新的 workflow 自動產生,重新編譯發布網站)
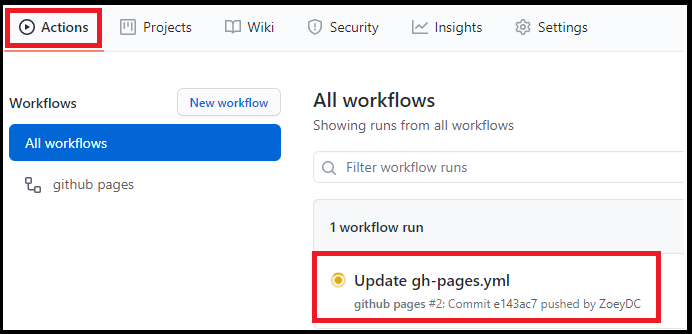
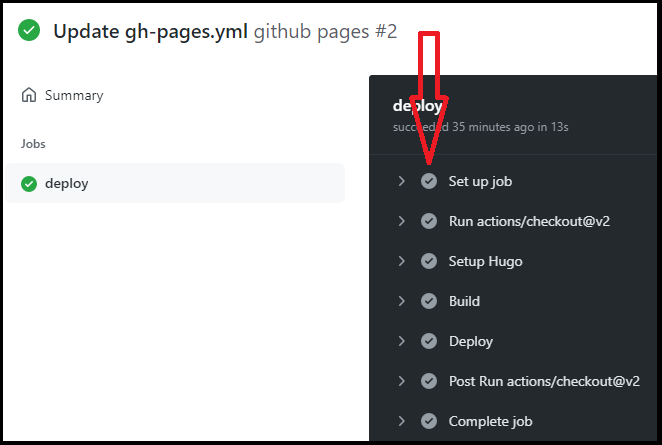
全部都 ✔ 表示順利完成編譯囉。
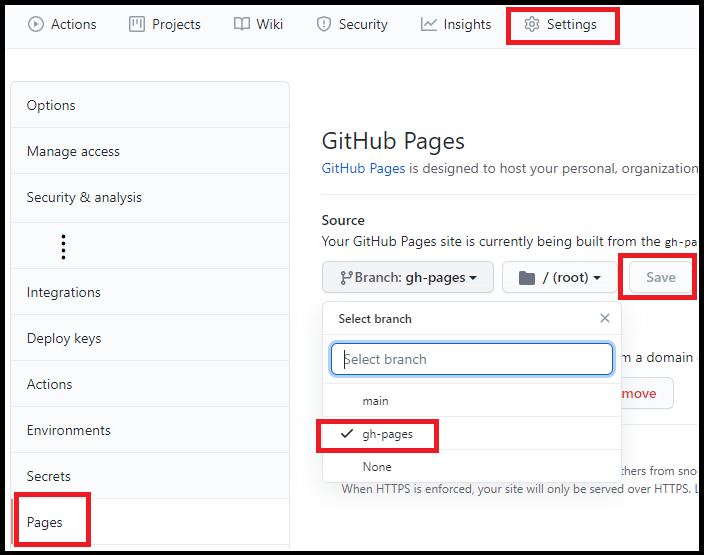
接下來設定 GitHub Pages 要讀取 gh-pages 分支的檔案,設定完就可以到 https://{username}.github.io 瀏覽網站成果。
方法二:上傳 Public 資料夾
先以 hugo 產生靜態 html 檔案,成功的話會在 mywebsite/public/ 裡面看到檔案,再將 public 資料夾 push 到 GitHub。
| |
參考上圖到 GitHub Pages 設定要讀取的分支為 main,就可以訪問 https://{username}.github.io。
自訂網域
GitHub 官方建議先在 GitHub 中設定 CNAME,再到 DNS 供應商設定 DNS 紀錄。
新增檔案 CNAME
在 GitHub 網站介面中可以設定網域名,其機制是在 Pages 的目標分支根目錄下加上 CNAME,但是這樣每次有檔案更新 CNAME 就會被覆蓋掉,要再重新設定,所以 Hugo 網站是要新增 CNAME 在 static 資料夾中,這樣編譯後,檔案會自動放在網站根目錄下,GitHub 就能以此偵測自訂域名。
CNAME 檔案(無副檔名)內容就只放自訂的網域名(例如 www.customdomainname.com)。
設定 DNS
到 DNS 供應商設定 DNS 紀錄,增加 4 筆 A Record 和 1 筆 CNAME Record(以 www 為例)。
| Type | Host | Value |
|---|---|---|
| A Record | @ | 185.199.108.153 |
| A Record | @ | 185.199.109.153 |
| A Record | @ | 185.199.110.153 |
| A Record | @ | 185.199.111.153 |
| CNAME Record | www | {username}.github.io |
更改 repo 名稱(非必要)
最後可以將 repo 名稱改為現在的網域,然後將 Pages 的 Enforce HTTPS 取消再重新勾選,讓 SSL 憑證重新產生。
結論
基本上一步一步執行就可以完成 Hugo 網站建置,如果一開始就打算自訂網域也可以先新增 CNAME 檔案以及用自訂網域作 repo 名稱來簡化步驟!